Noah B Woodworks

A woodworking page for the free time foot soldier

Hello there! My name is Noah Budd and I am a woodworker from southeast Michigan. I hail from a small set of towns in the Upper Peninsula called Houghton/Hancock. I lived there for 24 of my 31 years, and graduated from Michigan Tech in 2019 in audio production.

In my free time I am a dad first and hobbyist second. I make music, read books, smoke pipes, and kayak fish. I am a broadcast engineer in my professional life, working an early morning 3:30 – 11:30 am shift. The early bird has most definitely gotten a worm or two.

Thanks for stopping by my site and feel free to reach out to me on Instagram @noahbwoodworks or via the email found on the contact page

-Noah

  • The blog posts for this week may be a little empty because I did not do very much woodworking last weekend. It was -15 degrees on Saturday, so my brother and I did a little ice fishing and hammered some of the smallest panfish you’d ever see. It was very fun.

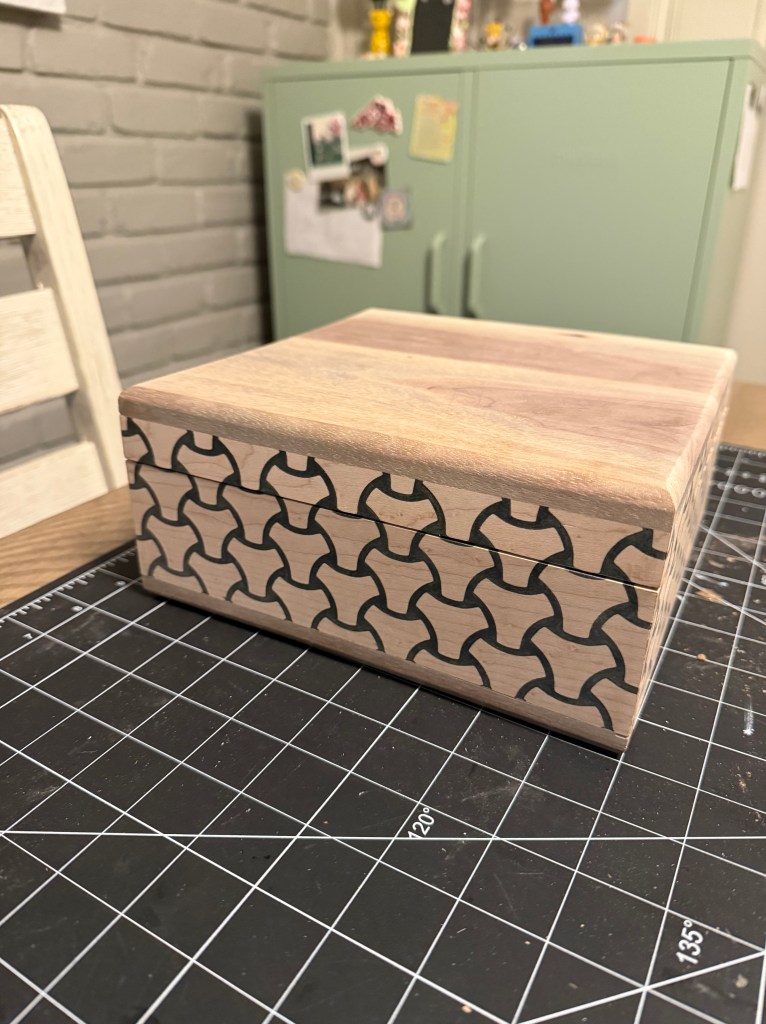
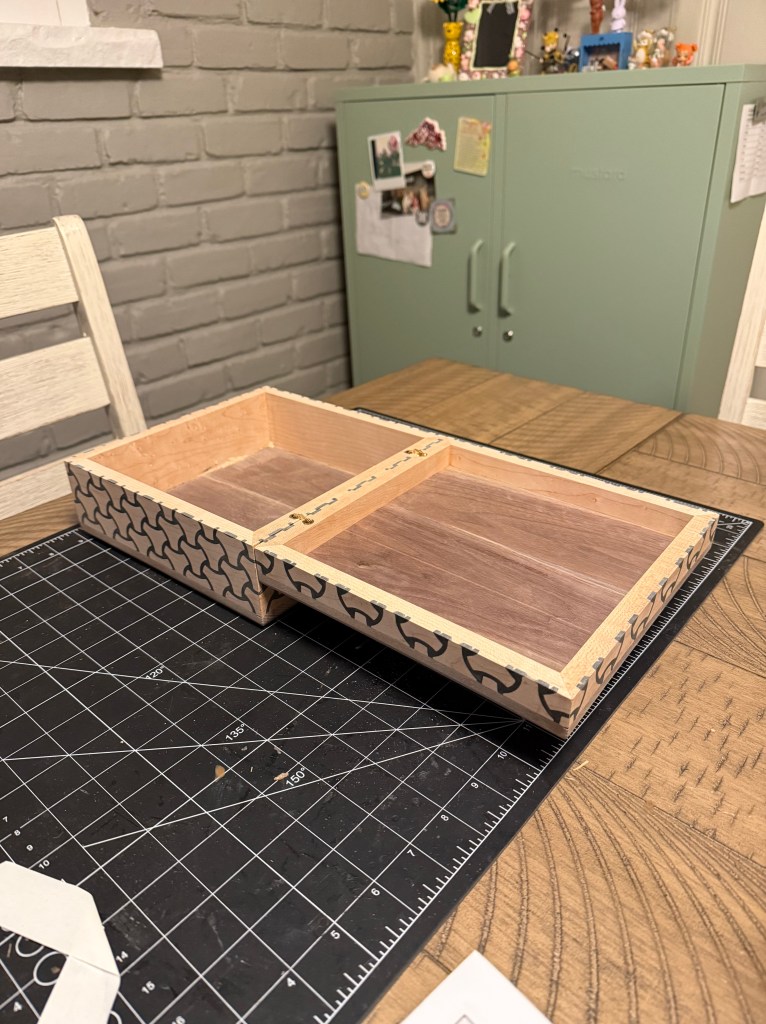
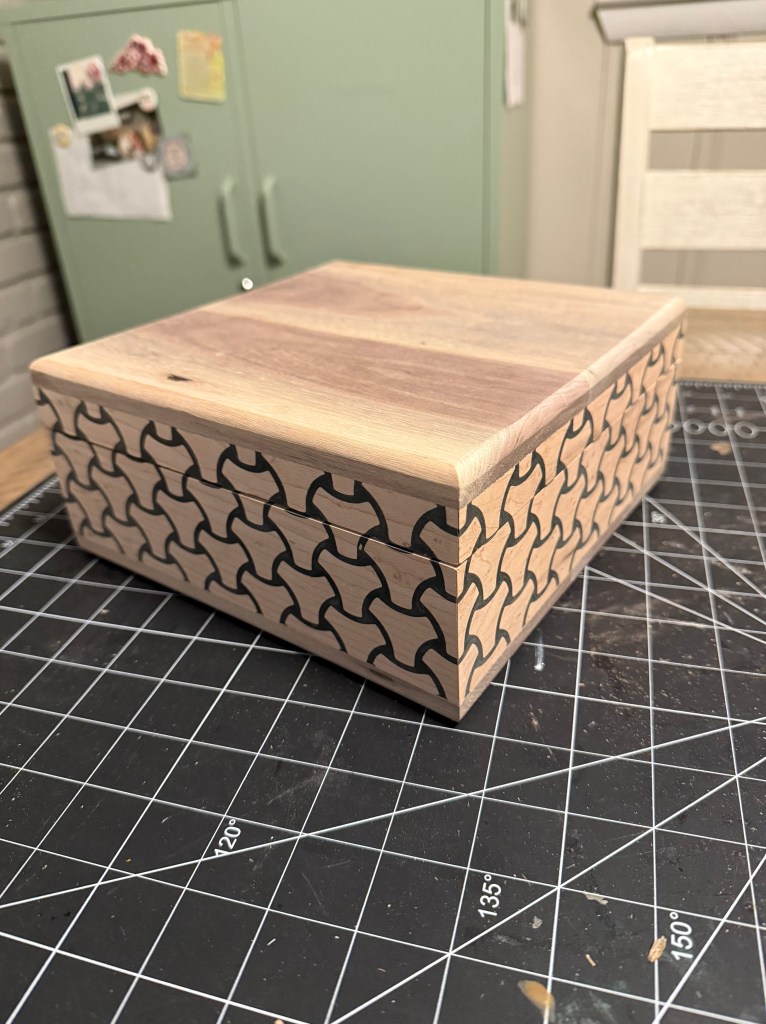
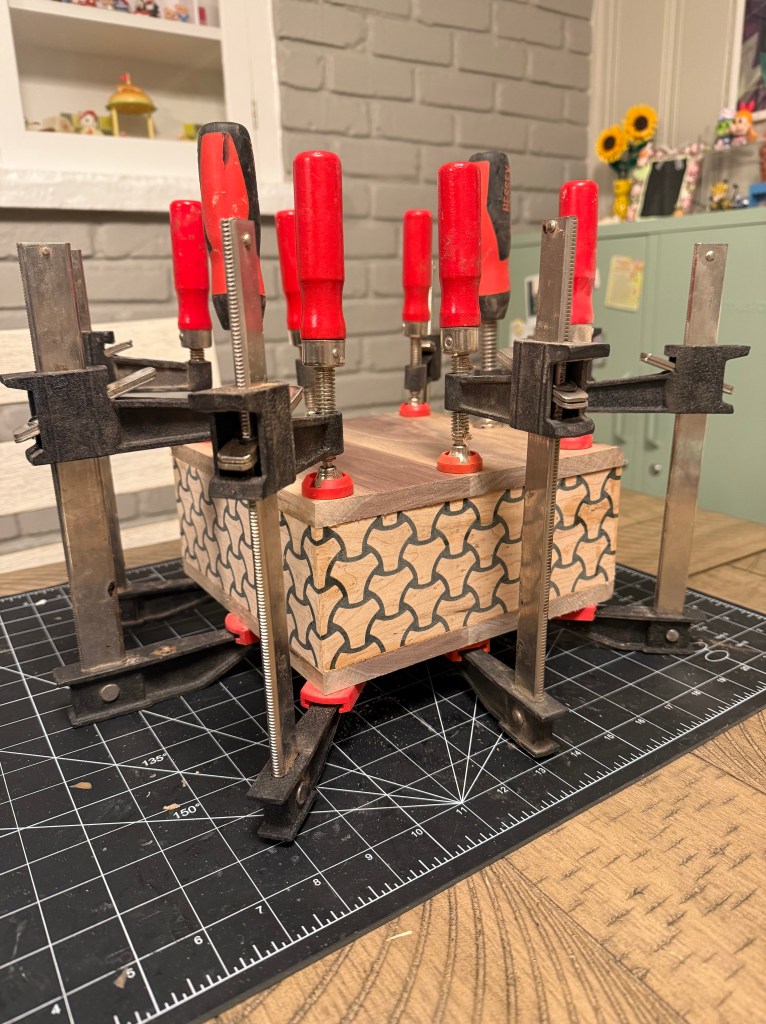
    On Thursday I was able to finish the tessellated box, and I’ll attach some pictures. It happened to be a huge struggle and I’m not the most satisfied with the way that it turned out. It looks great, but to get it there was cumbersome and unsmooth specifically regarding the hinges and separating of the lid. I haven’t put finish onto the box yet and that will be the last step. I’m thinking this will be temporary cigar storage until I can make a proper humidor.

    The cheap barrel hinges that I used were not the correct ones, and I believe I can do much better on the next box. It would be wise for me to use a specific high quality hinge for every box that I make, then create a jig that makes the installation of that hinge easy and consistent. There are a million different hinges, but Rockler sells nice ones, and there are ones that make the opening and closing of the box more rigid. These hinges give the box a high quality feel when its being opened and closed.

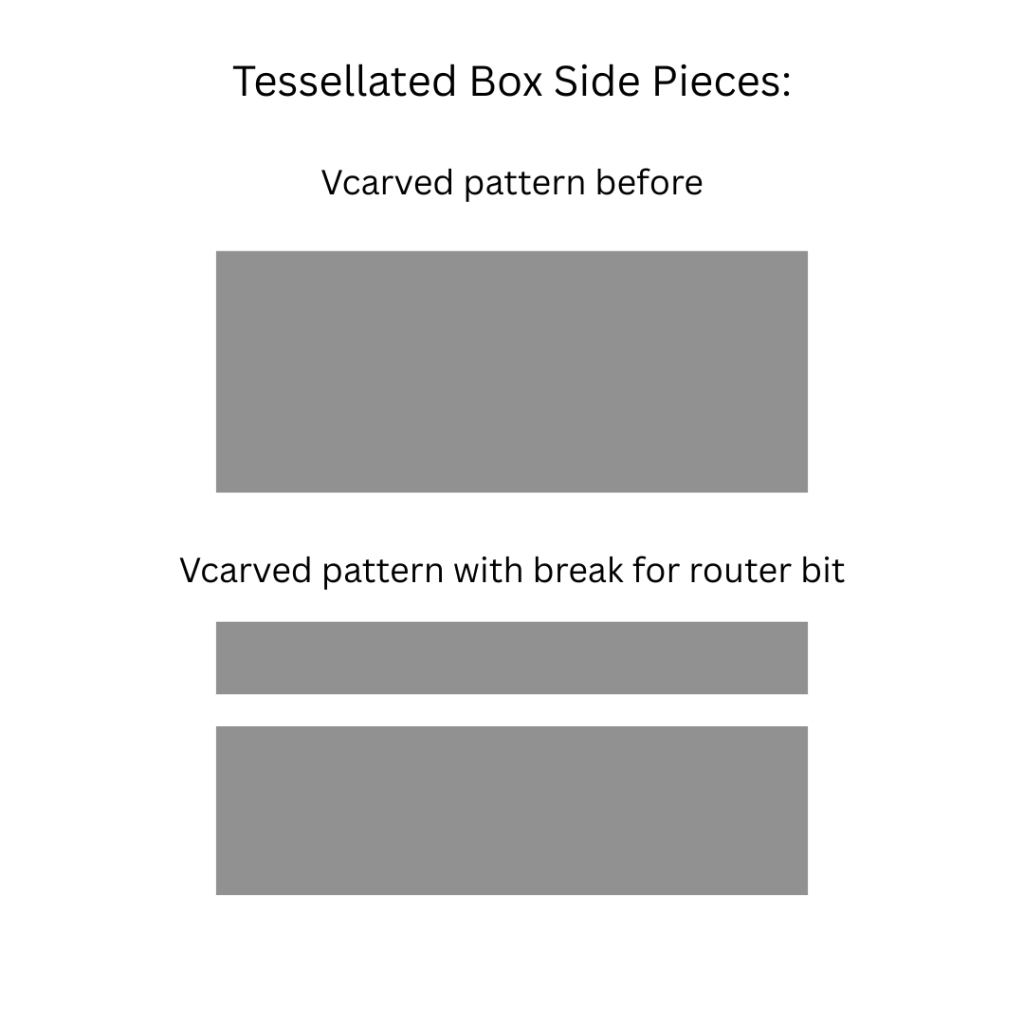
    After thinking about the box lid, I’m thinking that I need to separate it at the table saw. Meaning instead of a quarter inch gap for the router, I’ll need to leave an eighth inch gap for the table saw blade. I believe this will deliver the best result, even though cutting the lid out on the table saw seems dangerous, I’m sure it will go smoothly. I could perhaps cut 3/4 of the way through, keeping the lid fastened to the box, then finish the cut with hand saws and planes. That might be the way to go. Seems like a good balance between safe and fast.

  • Unfortunately there has not been much progress on the tessellated box project. I sanded the outsides to 400 grit, and routed the round over onto the box lid and base. Shortly after I started cutting the lid apart by hand but was interrupted by family shenanigans. I’m hoping that I’ll be able to get out into the shop this afternoon after I’m done working. Today is my Friday so I’m most definitely looking forward to the weekend. Much like last weekend, I’ll be looking to finish the tessellated box and I’ll hopefully have pictures early next week.

    My brother and I are going ice fishing on Saturday morning, which should be a ton of fun. I’m looking at getting a cheap shanti off marketplace so we don’t freeze our asses off. I’ll be hoping to get a little propane heater as well and we should be all set. It’s been tough the last few weekends but the weather has finally gotten cold enough so that there’s good ice. My brother and I are just getting into it so we aren’t kitted to the nines quite yet but we’ll get there soon enough. We just got some new fancy jigging rods that we’ll get to try out this weekend and I’m very much looking forward to it.

  • I had an idea this morning on my way to work that might make the cutting of the lid of tessellated box more accurate/straightforward. So the current procedure is to v carve the tessellated pattern, pour the epoxy, sand the epoxy and then re mount the pieces on the CNC to be cut into the rectangles that make up the sides of the box. During that last step, If I CAD in a horizontal break in the tessellation that is a quarter inch wide, then I can use the CNC to create the lid section of the box. Then, during glue up, I can scotch tape the two pieces together so the pattern gets aligned correctly as it’s being glued.

    With this method, I’m putting a lot of confidence into the scotch tape to hold things together, as it will also be holding the pieces together as the miters get cut on the table saw. I’m putting a lot of confidence into the CNC as well, for if the re-placement of the workpiece against the fence is off, then the pattern won’t look right. I suppose I can hand plane away any error and the seam will still probably look better than cutting the lid off with a hand saw. I might add a few hundredths of an inch to the router cut so that I have to plane the pieces down, which would further increase the accuracy of the seam.

    That adjustment to leave a quarter inch gap for the router bit to cut the lid pieces away from the base pieces happens at the very first step in the whole project, so I’m hoping that I wont forget to try this when I attempt to make the next one. I drew an example of what I’m looking to do in Canva:

  • There’s nothing too crazy different to report on since yesterday. I’m happy with the 3D printer upgrade, it definitely makes a significant difference in the amount of noise that’s coming out of the machine. I’ve sort of been in music making mode for the last few days and yesterday I rearranged a bunch of hardware in the studio. I know what needs to happen out in the shop but I haven’t gotten to it yet. Unfortunately that doesn’t make for a very interesting blog post. My daughter has daycare today so I’ll try to motivate myself to get out there for a couple hours to finish up the tessellated box project.

    I really like the way that this tessellated box is turning out. I’m very interested to try another pattern, and to sure up my method for making mitered joinery. Obviously doing it on the table saw with a sled is probably the best way to go about it, but I can’t help but think that there’s a better way. It seems that the miters are just a little bit off, and there might be some play in the table saw and sled that’s causing small gaps to occur at glue up. From a distance it looks fine but because the tessellations will likely be getting more and more detailed, those gaps will become more and more of a problem.

    I’d also like to do rabbeted joinery for the top and bottom. The butt joint looks a little sloppy on this first one. It should clean up with a round over but still. I’ve been wanting to make a humidor for myself so I’m thinking that’ll be the next project. The tricky thing with humidors is that the inside is lined with either Spanish cedar or Honduran mahogany. It’s easier for me to get Honduran mahogany here in Michigan and I’ve got some from the last time I attempted to make a humidor. A thin quarter inch lining is all that is needed, and I’d most likely do a box within a box method. I’d make the outer box first and then carefully do the lining with the mahogany. More research needs to be done there as to what method is best for my shop.

    Another adjustment I’d like to make is to CAD in a horizontal break in the tessellation that is the width of my table saw blade. This way I can cut the box lid off at the table saw, which seems a little sketchy, but it would theoretically be more accurate. I could also do this with my thin Japanese pull saw blades, but it’s almost not even worth doing, as those are around a 32nd or 64th of an inch thick. It really depends on how this first one turns out, and if the material that’s cut away makes the tessellation look weird at the seam.

  • Over the last week or so, I’ve been printing pieces to an upgrade to my 3D printer. I purchased my 3D printer on a black Friday sale last year and it cost $250 marked down from $350. It’s a FlashForge Adventurer 5M. 3D printing nerds might already know that you can modify this machine and FlashForge sells an enclosure kit where they send the hardware and acrylic panels, then you 3D print the parts for the enclosure. This mod gives the printer all of the bells and whistles of the higher end machines at a lower cost.

    There are a few benefits to this that really help quality of life: It reduces the noise of the machine, it helps regulate the temperature of the machine, which is important in 3D printing, and it keeps some of the fumes from escaping into the air. Albeit, I’m skeptical as to how effective that last point is, but we’ll see. I often like to print things overnight, and I had put a towel under the door in my office to keep some of the high frequency noise from entering into our bedroom. It’s an annoying thing to listen to when the house is quiet and we’re trying to sleep.

    I’ll attach a picture of the enclosure from 5M, I forgot to take a picture of my modded machine. It looks sweet but took forever and a day to build. Printing the parts took a total of 2 and a half days of printing time. Then removing all of the support structures took 2 or 3 hours yesterday. Figuring out how to assemble and build the enclosure kit took another 2 to 3 hours. A lot of cursing and frustration later, the mod was done. I ran a print last night and it really does help tame that high frequency noise so you don’t notice from 20 feet away.

    Next on the list of 3D printing things to-do is finish making the gridfinity for my office, and I’m not really sure what’s next after that. I’ve got some ideas for projects to do for work, as I’m still trying to convince them that we should get a 3D printer for the engineering shop. I might try to do more upgrades to the camera like making a motorized slider but we’ll see. I’d like to print some pointy pyramids that will help with finishing. I can put 2-4 of these down on the workbench flat, place the workpiece on top, and they’ll allow air to get underneath workpieces as the finish dries. That’ll take no time at all though, and are good for using up the ends of spools.

  • I ended up taking my Thursday and Friday off last week to help my wife with her mom. My wife has traveled to Ann Arbor every day since last Monday and so I helped with the house and toddler. It has been really rough on her and her guardian mom.

    I was still able to wake up early and make progress on some projects. The tessellated box project is almost done. I’ve attached a picture of it clamped up. I chose walnut for the top and bottom. I did a butt joint instead of rabbets. I wanted the full 1/2″ of material to be showing, and it saved me some time. I’m confident that the joint will be strong enough, even though I would have liked to do rabbets.

    The box is turning out fairly well. I tried to leave the top and bottom edges proud so they could be flush routed perfectly flat to the sides of the box. The miters are fairly good, I think if the tessellated pattern weren’t there I’d try to fill some gaps with a wood glue and maple sawdust mixture. I’ll leave them alone this time though because the pattern does line up really well on every corner.

    Next steps are flush trimming, routing on a round over on the top and bottom, sanding to 400 grit, and cutting the lid off. Once the lid is cut off I can install the hinges and add the feet. After that’s done I can finally apply some wood finish and it’ll be complete.

  • I’m going to get personal for a second. This week has been heavy for my friends and family. My wife lost her biological mom last night, which was awful. Grandma June left this world somewhat comfortably in the hospital shortly after experiencing a collapsed lung. The doctors gave her morphine, which helped. Her passing was bittersweet, as she suffered a traumatic brain injury when she was just 16 years old, over 30 years ago. It’s strange, the doctors said she was never supposed to live this long, and her life was a testament to her immense strength as an individual.

    My boss’s dad died last Wednesday, which was slightly more tragic because it happened out of the blue. He’s technically my boss, but he’s more of a friend. My buddy expressed early last week that his dad was in the hospital for pneumonia, and there wasn’t too much to worry about. Things took a turn for the worse on Wednesday night. He returns to work today and I’m sure he’s in distraction mode, just looking for anything to take his mind off what happened last week. It hurts to see the people whom I’m closest with in life hurting like this.

    Needless to say, its been a rough few days. I’ll attempt to return to discussing the tasks at hand, and what progress I’ve made recently in my crafting endeavors. At this point in the week, I’ll expect to finish the tessellated box project this weekend, and make that the goal. It would be interesting to make more than one, and what’s important is getting through the first box with no hiccups. I haven’t started editing the video but because it’s being shot with the nice camera, I’m confident that the footage is good. I’m hoping it will make for a good video.

    We’ll see what the ice looks like this weekend. We’ve been having very warm weather for winter in southeast Michigan, so I’m guessing the ice will be sketchy. I’ll most likely need to order a higher quality spud bar to make sure I can get out there safely. Lake St. Clair might be a good look, and we’ll see what the ice report has to say. I’d like to travel about an hour north and hit some inland lakes if they’re frozen over.

    I successfully 3D printed a housing for my fish finder. It turned out awesome. It takes 14 hours to print, so its a huge time investment. I discovered a reliable way to glue 3D printed pieces together that are made from PETG filament. JB weld makes a glue called plastic weld that literally fuses the plastic pieces together. It gives me a lot more confidence than super glue. I discovered that if you’re going to have parts that fit into each other, there needs to be a tolerance of around 0.1 mm on all sides for the pieces to slip together nicely. I’ve attached a couple of pictures of the fish finder.

    Next on the 3D printing list is printing a housing for the 3D printer itself. I ordered the enclosure kit off Amazon and it should help with fumes and noise, which are my two biggest concerns when it comes to 3D printing. It would be best to filter the air coming out of the printer, but that is a problem for a different day.

  • Unfortunately due to unforeseen circumstances I was unable to progress the tessellated box project. It should be fairly straightforward from here though and I’ll post pictures and a link to the video once it’s completed. I just need to go slow and take my time with the miters, making sure that they’re perfect. the whole concept will look bad if the miters aren’t done well. The tessellations are supposed to wrap through the miters, which is the whole gimmick behind what makes this box unique.

    Once the miters are glued, I’m debating how to do the top and bottom. I know I’d like to do a rabbeted plate where the sides of the rabbet show outside of the box, but I’m debating whether I’d like to do them on the CNC or cut the rabbets with a router. The CNC would be more precise, but possibly take longer to program and set up. Sometimes cutting rabbets with the router leaves the rabbets cut poorly at the beginning/end of the cut. We’ll see but I’m thinking I’ll be doing them on the CNC.

    I was able to do something yesterday though. I ran a massive 14 hour 3D print. It’s a small carrying case for my ice fishing fish finder. I’ve got a Garmin Striker 4 and it came with a kayak that I bought last summer. The transducer is integrated/glued into the kayak, so using I didn’t want to remove it just to ice fish for a few months. I bit the bullet and purchased the ice fishing transducer, that has a flotation ring around the wire and designed a little carrying case that is similar to the Vexilar flasher Genz case.

    Here’s a picture of the 3D model. Doing this saved almost $300 over a different fish finder and $150 on the Garmin Striker 4 ice fishing bundle. Figured it’ll be handy to have out on the ice for years to come. There may also be opportunities to sell this in the future. The Garmin Striker 4 is very common, and most budget friendly FF out there. So we’ll see if people like this setup.

  • Last weekend was very productive and lots of things got done, albeit lots of it was not related to woodworking. I cleaned out our entire garage, and made space for my car to fit again. It’s a tight fit, but I’m making much better use of my wall of bins and purged a ton of unused items from storage. I went to an ice fishing expo with my brother and a friend of his. I bought a new jigging combo, a jaw jacker and some baits. I’m really looking forward to getting back out on the ice hopefully next weekend. I need a better spud bar and I’m looking to upgrade the auger next.

    I finished 3D printing the camera housing and I’ve attached a few pictures to this post. Its very functional and I’ve already started filming another video for YouTube. The clasp on the top of the battery housing is a little loose, so I wrapped it with E tape to make sure the camera never slips out of there when tilted forward. The tripod is a little flimsy for the rig, but I think that’s okay for now. I ordered new batteries for the monitor, as the old ones don’t hold a charge anymore. The monitor is nice because the camera needs to be manually focused.

    I started filming the tessellated box CNC project with the new rig yesterday. I cut the v-carve 4 times into some birds eye maple that’s been sitting around for a long time. I filled the voids with epoxy yesterday and I’ll sand them down today when I get home from work. I’m thinking I’ll run the cut out carves with a quarter inch bit, cut the miters on the table saw and try to glue the four sides of the box together today. I’m paranoid about one thing though. The miter jig I’ve made for the table saw doesn’t play well with small parts. I’m tempted to cut some extra material onto the ends of each box side, that way when I cut the miter, it wont bind into the table saw blade and cause havoc. There will be enough meat on either end to stay on top of the jig. Small pieces tend to get into the throat of the jig and the saw sends them flying in chaotic directions.

  • I’ve definitely been in a funk this week. Getting back to work from a short vacation last week has me feeling down. It was way worse yesterday, and I’m hoping that next week will be better. You can tell by the length of a blog post how much I’m feeling like taking on the weight of the day. When the new year comes around, it’s strange because in the grand scheme of things nothing has changed, yet our society is hell-bent on renewal and rebirth. I don’t feel like anything has changed, and it’s just a normal week for me, which is adding to the strangeness I’ve been experiencing.

    I’m definitely looking forward to the weekend, and today is my Friday, even though it’s Thursday. My brother called yesterday and it looks like we’re going to an ice fishing expo tonight in the late afternoon. I was planning on going ice fishing tomorrow morning, but the weather is going to be crazy warm. It’s going to be 50 degrees and raining, so I may need to pivot my plans. I’m sort thinking I may go on Saturday morning, and woodwork on Friday. Friday seems like a good day for woodworking.

    The goal for this weekend is to make the tessellation box, and film it for YouTube. I’m very excited for this project, as it should look really sweet. I’ll do the CNC work on Friday, then fill the voids with epoxy. If Saturday is a bust for ice fishing, I’ll sand the epoxy away, cut and glue the box together. Then Sunday after I work I’ll finalize the box. I’ll edit the video next week and hope to upload midweek to Youtube.

    I’m getting very close to finishing the camera housing. The battery and camera are mostly done, but the monitor housing is giving me some trouble. I made it beefier and thickened the walls. It is still a tight fit and I’ve got to make holes for the connectors on the side. After the next print or two it should be a done deal. Hopefully I can use the new camera rig to film the tessellation box. It’s slowly coming together.