Noah B Woodworks

A woodworking page for the free time foot soldier

Hello there! My name is Noah Budd and I am a woodworker from southeast Michigan. I hail from a small set of towns in the Upper Peninsula called Houghton/Hancock. I lived there for 24 of my 31 years, and graduated from Michigan Tech in 2019 in audio production.

In my free time I am a dad first and hobbyist second. I make music, read books, smoke pipes, and kayak fish. I am a broadcast engineer in my professional life, working an early morning 3:30 – 11:30 am shift. The early bird has most definitely gotten a worm or two.

Thanks for stopping by my site and feel free to reach out to me on Instagram @noahbwoodworks or via the email found on the contact page

-Noah

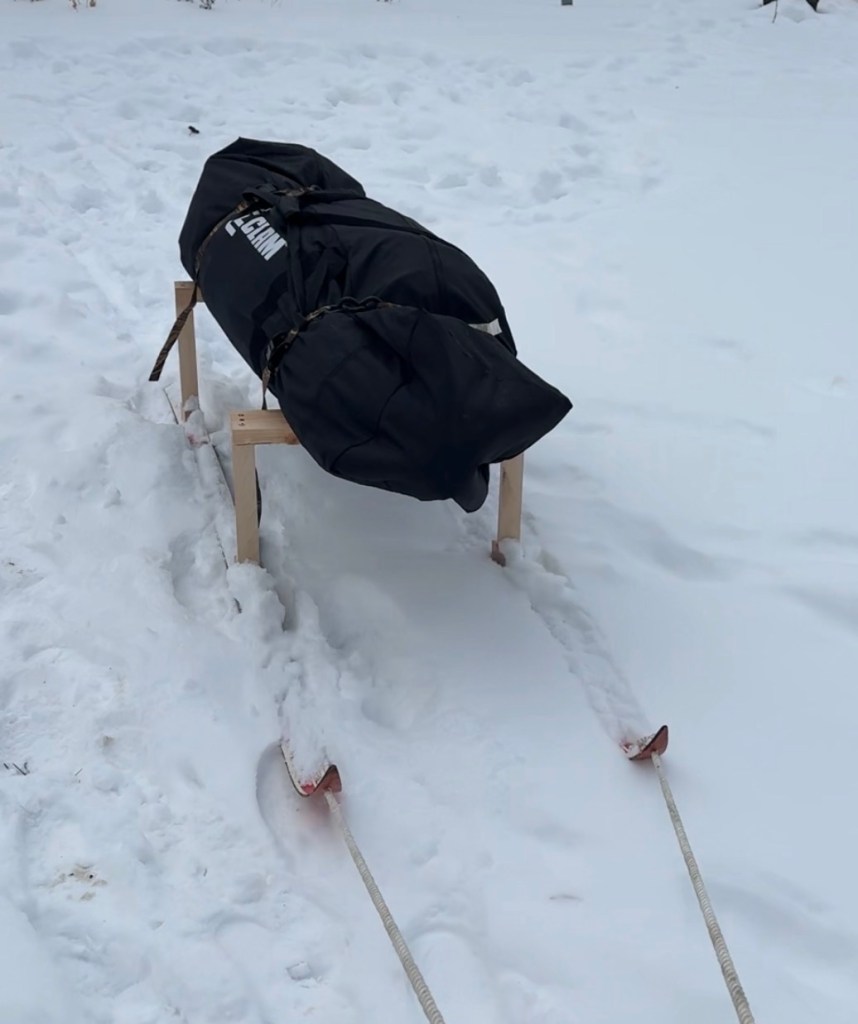
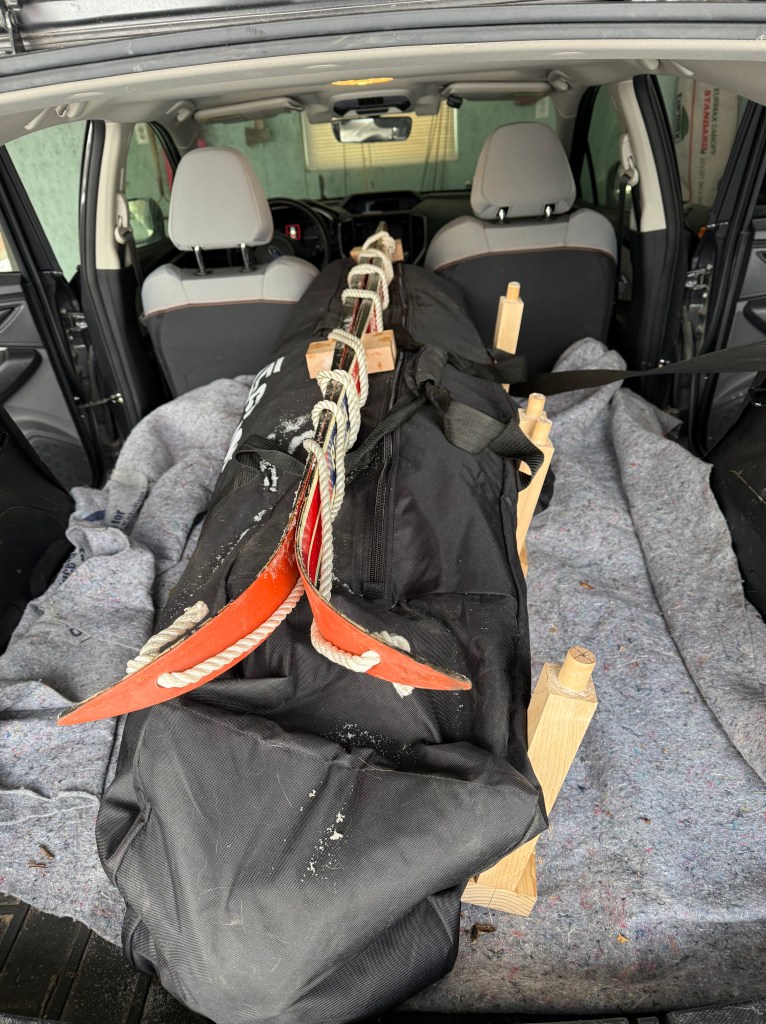
  • I ended up taking my Friday off to ice fish Lake St. Clair. I needed to return a buddy heater to the Bass Pro that was close by so I figured that Lake St. Clair would be a good look. When I got off work on Wednesday, I picked up a cheap set of antique downhill skis off Facebook marketplace. I turned them into a smitty sled for my shanty. The smitty sled collapses down, and was made from scrap 2×4 and scrap hardwood. It only took a couple of hours, and does its job very well. It’s much easier to pull the shanty on a sled than to carry it. I needed the sled to collapse down because my car is at capacity when it comes to gear. I caught one singular perch on Lake St. Clair and the fish were being very finicky. I was at about 9.2 feet of depth.

    Screenshot

    My brother, stepdad and I went up to an inland lake on my Saturday. We ended up catching a lot more panfish and it was so fun. It’s nice to have a decent quality shanty, as there was some wind and it was very chilly. I’m struggling to focus on just about anything else. Work this week already feels like an enormous slog, and I’ve got a dentist appointment on Wednesday. It’s just one of those weeks living in Michigan where the gnarly-ness of the winter season has caught up with everyone.

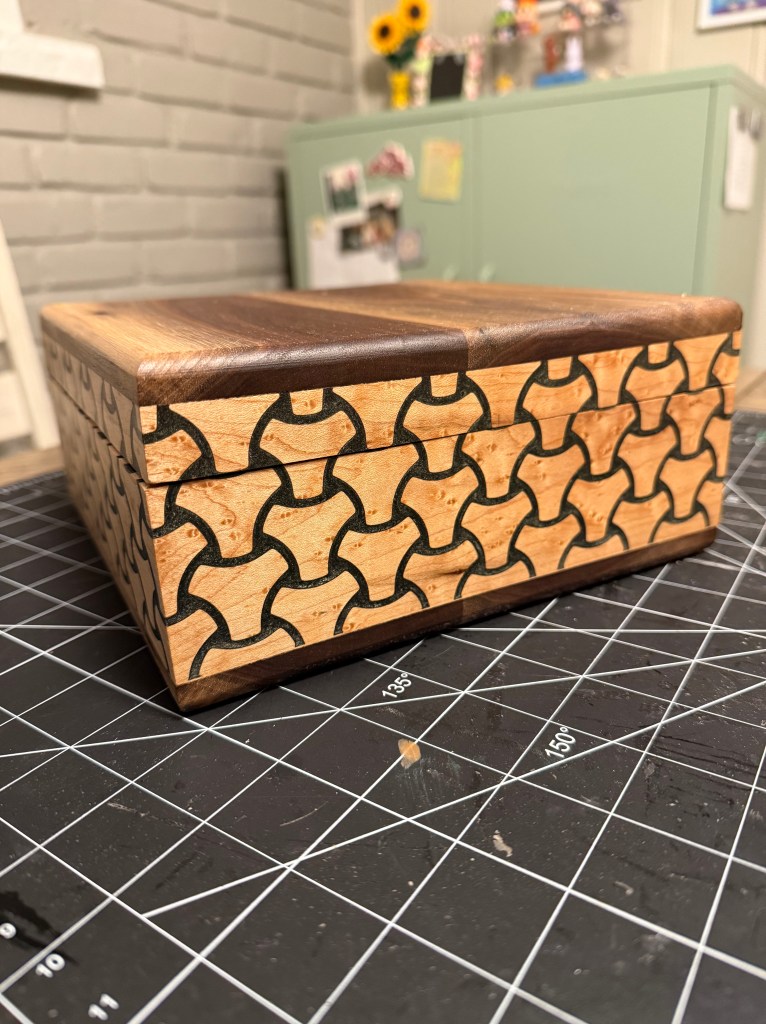
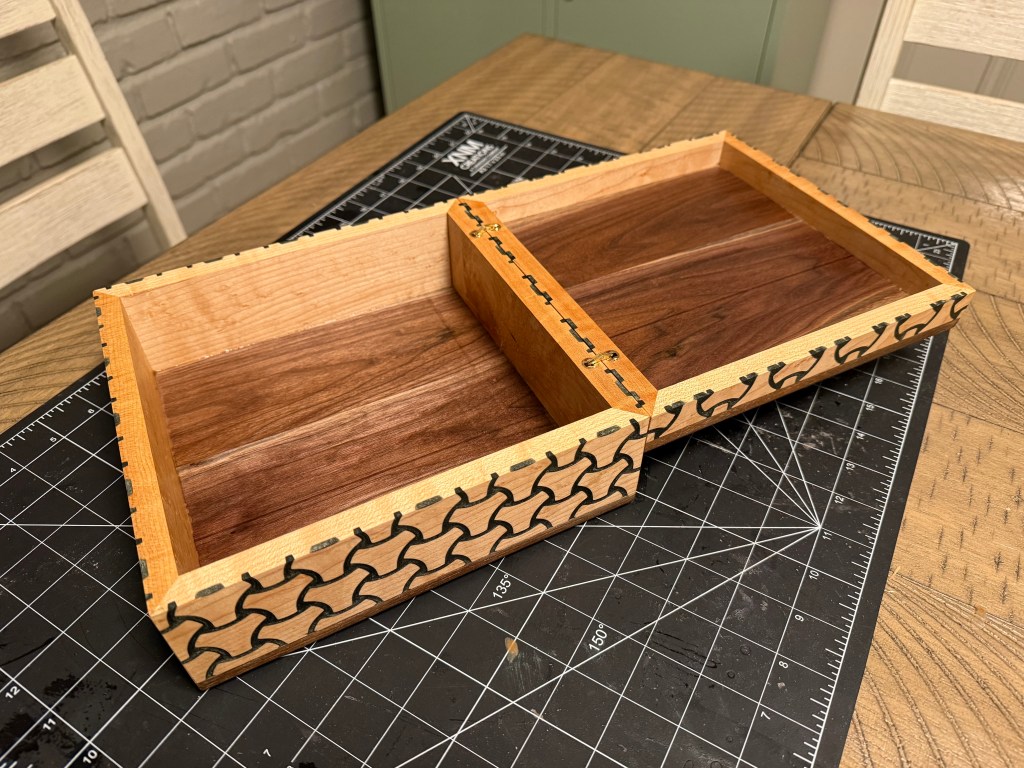
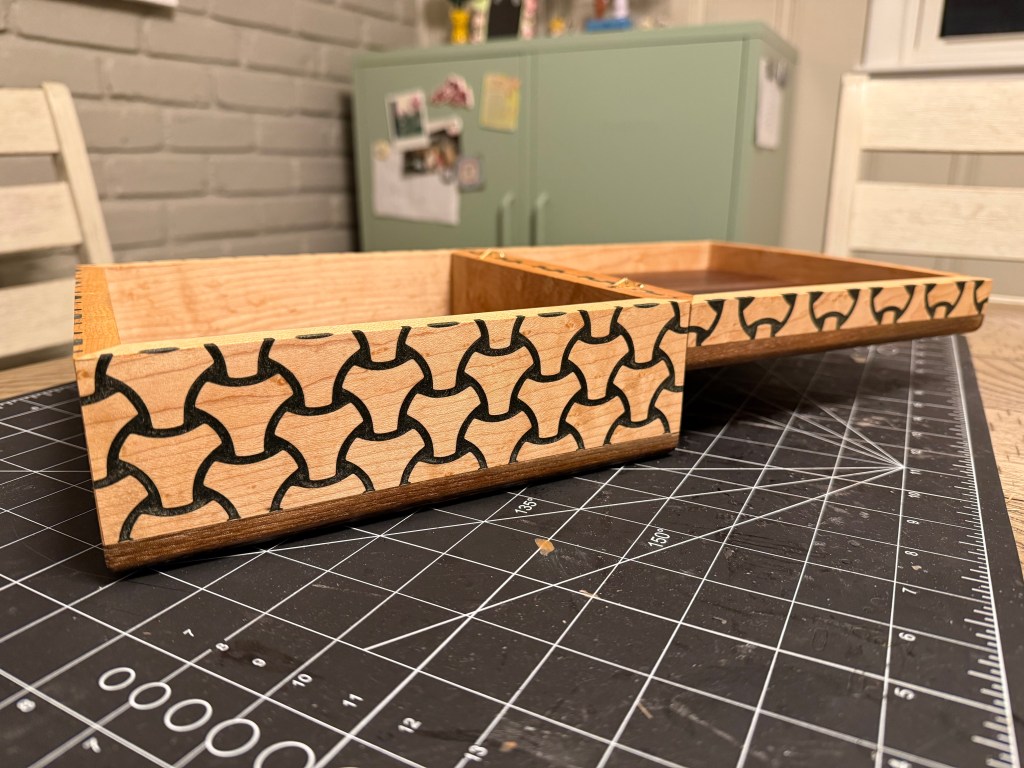
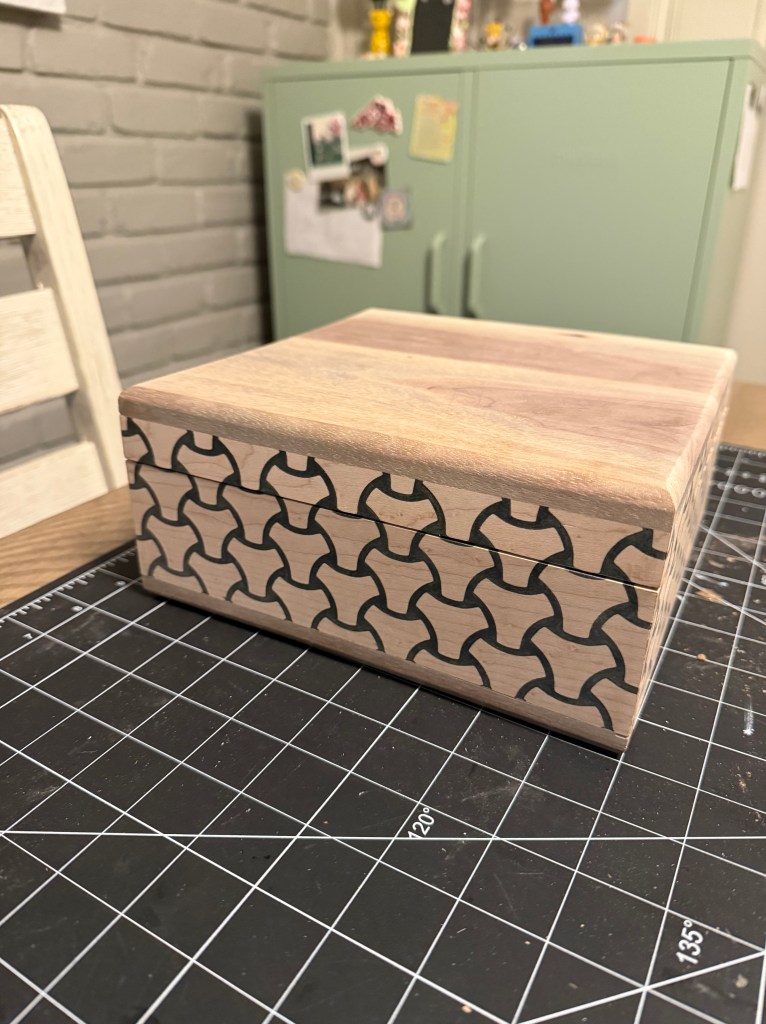
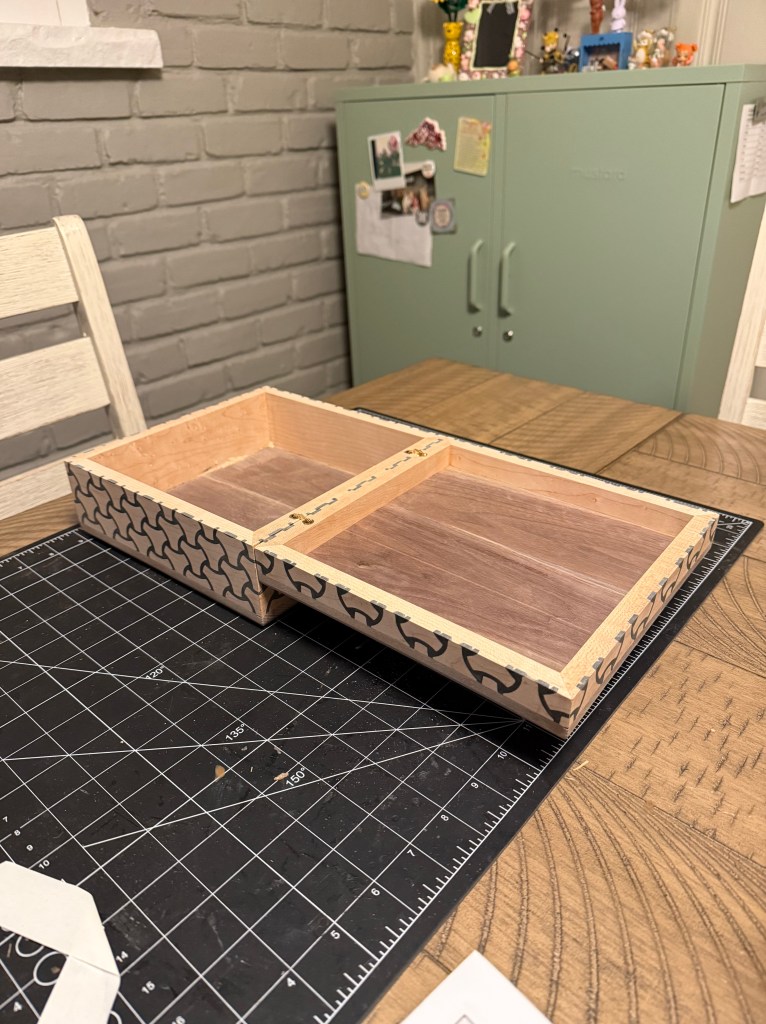
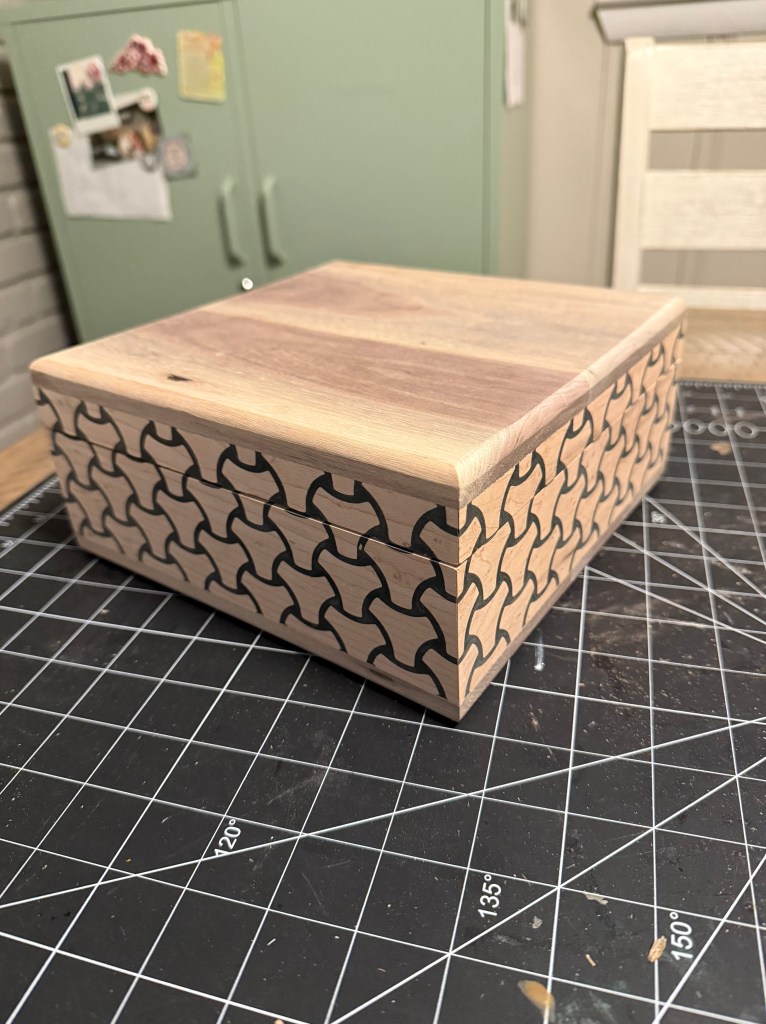
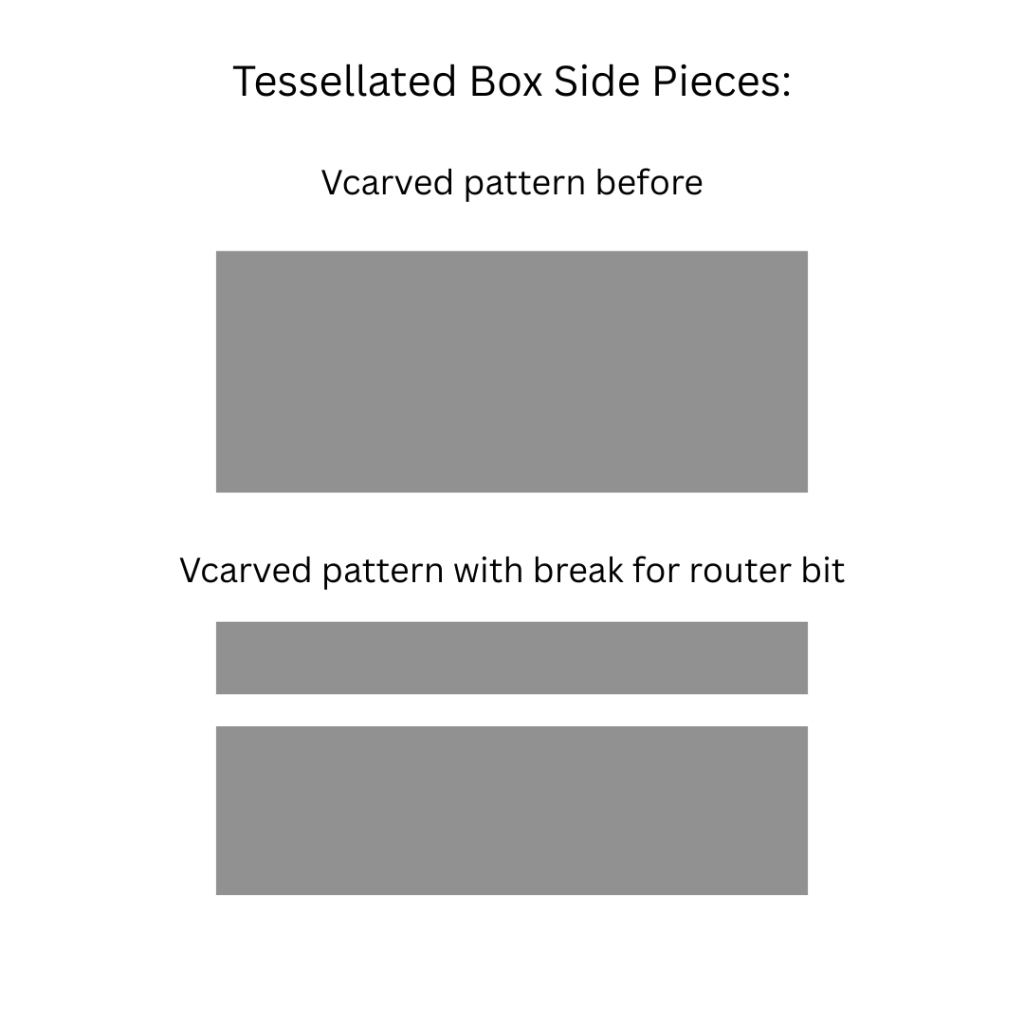
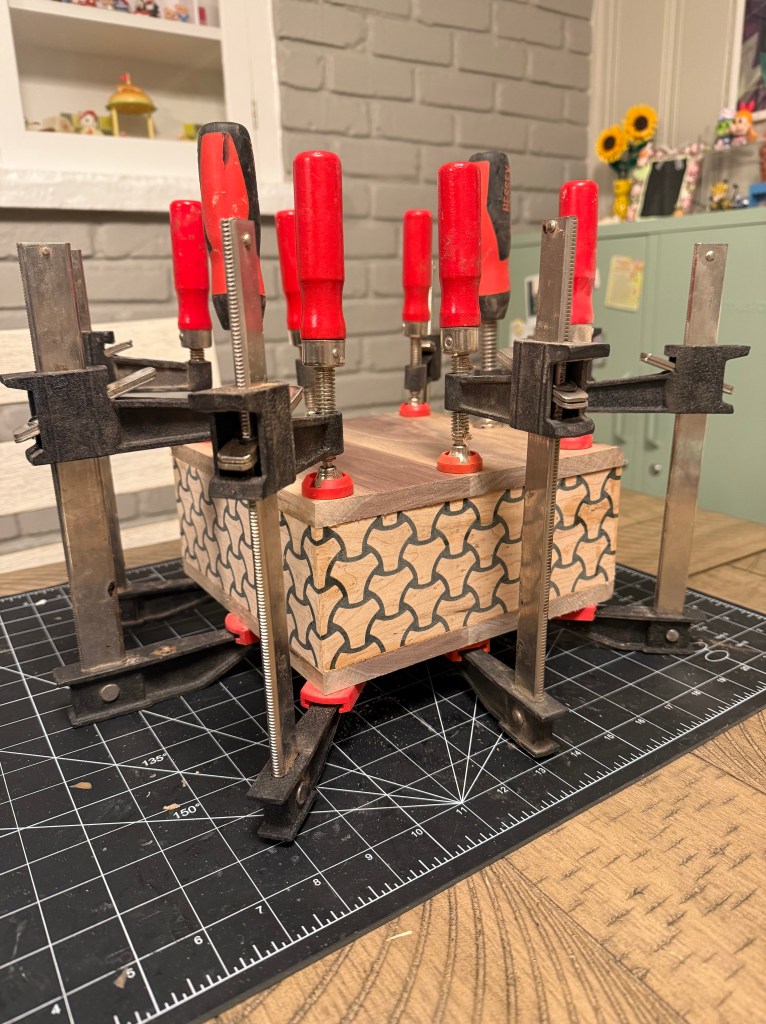
    As far as woodworking goes, it’s so cold that it’s difficult to do anything. I started work on a walnut pipe that I’d like to continue working on. I’m still unable to glue anything outside. I uploaded a video about the tessellated box, and I most definitely need to make another one. I’d like the next one to be either a humidor or puzzle box. I also need to create the jigs for the joinery of the box top and bottom.

  • I’ll most likely be dragging my feet getting another woodworking project started over the next few weeks. It’s still very cold, and there’s a ton of snow on the ground, so early morning woodworking is not the most appetizing of thoughts. Ice fishing on the other hand has completely taken control of my life. I purchased a shanty last weekend and that completely changed the experience. I’ve got to figure out better methods for getting it out onto the ice. It’s very heavy and takes up a ton of space, so my car is pretty much at capacity as far as gear is concerned.

    The Genz pack for my fish finder that I 3D printed works really well too. It was so fun last weekend seeing the fishes on the flasher and watching them come up after our baits. It’s getting so bad that I’m debating taking time off work to go and get out on the ice some more. I figure the ice will only be here for so long, and now’s the time to get out there. It’s been between 0 and 7 degrees for the last week straight in southeast Michigan.

    I was able to attach the drill attachment that I purchased to the auger I got from Facebook marketplace. This is great because this auger’s blades are very sharp, and the diameter of the auger is smaller. It should be easier to poke holes in the ice without frying my handheld drill. Depending on the weather, I might be doing some run and gun fishing one morning and then set up the shanty the next, we’ll see. It would be good to get the shanty set up both mornings, it just is a decent amount of effort to get it out onto the ice in the first place.

  • The tessellated box is officially done. I completed the last step yesterday and I’ll start work on the YouTube video later today. I’ve attached some pictures. I’ve got a few ideas for the next one. I’d like to see if I can do a wood inlay for the tessellation. Instead of filling the female engraving with epoxy, you fill it with a male insert and then remove the material down to the surface. I think this will make for a more interesting looking box.

    Another idea I had was to leave a small border on the top and bottom. You can see how deep the epoxy goes into the wood on the rim of the box lid and base. Leaving a border would eliminate this problem. I’d like to see what the box will look like when the top and bottom of the box are of the same species as the sides. This should make it look really uniform. I liked the contrasting wood colors that I did in the last box but I think it might be better if the box is more monotone. With the tessellation, it does look a little busy when the top and bottom are a different color.

    I also need to figure out and make a rabbeting jig for cutting rabbets into the top and bottom of a box. The joinery of the last box looked a little clunky in the sense that I did it fairly quickly and you can tell. I need to rig one of my routers to cut 1/4 inch by 1/4 inch rabbets on the edges of wood and leave it set up and ready to go. I think rabbeted joinery is a must for these boxes and will add to the rigidity and overall quality.

    I’d also like to make the next box a humidor, which adds a little challenge to the building of the box, as I now need to line the inside with a thin layer of Honduran mahogany. It also needs to be air tight and have a piston fit. It will probably need to be a little bigger, and possibly have a section for the humidifying agent, whether that be distilled water sponges or humidifying bags. I also need to find great affordable hinges and create a routing jig for installing them onto the lid and base of the box. Lots of work to be done yet.

  • I’m really dragging my feet finishing this tessellated box. I was very discouraged at my own craftsmanship in finishing those last couple of steps. Separating the lid from the base of the box, and installing the hinges was a clunky and cumbersome experience. The end result is okay, and it most definitely is a box. However, there are some flaws. I understand as well that it was the first one that I attempted to make, so it is foolish for me to expect perfection on the first go. Also, it’s still cold so I haven’t wanted to make the trek out to the barn with the soaked boiled linseed oil rags. I dispose of them in the fire place so if they do catch it’s no big deal.

    I finished another gridfinity drawer yesterday. They are taking about half a weed to do, and they really do make a huge difference in the amount of clutter that is in the drawer. It makes it so objects don’t just rock around freely inside and that in itself is worth doing in my opinion. I made a little music with my daughter yesterday, mainly just trying to stay inside. I need to figure out how to find balance between woodworking and fishing.

    All I ever want to do on the weekend mornings is go fishing these days, and it’s taken a toll on my woodworking as that’s when the majority of my woodworking can be done. Now that I’m ice fishing I’ve basically cut my woodworking time in half. It’s hard to achieve balance when you’re attempting to do too much. Family, woodworking, music and fishing all take a lot of time and it’s a constant struggle to keep the peace.

  • The blog posts for this week may be a little empty because I did not do very much woodworking last weekend. It was -15 degrees on Saturday, so my brother and I did a little ice fishing and hammered some of the smallest panfish you’d ever see. It was very fun.

    On Thursday I was able to finish the tessellated box, and I’ll attach some pictures. It happened to be a huge struggle and I’m not the most satisfied with the way that it turned out. It looks great, but to get it there was cumbersome and unsmooth specifically regarding the hinges and separating of the lid. I haven’t put finish onto the box yet and that will be the last step. I’m thinking this will be temporary cigar storage until I can make a proper humidor.

    The cheap barrel hinges that I used were not the correct ones, and I believe I can do much better on the next box. It would be wise for me to use a specific high quality hinge for every box that I make, then create a jig that makes the installation of that hinge easy and consistent. There are a million different hinges, but Rockler sells nice ones, and there are ones that make the opening and closing of the box more rigid. These hinges give the box a high quality feel when its being opened and closed.

    After thinking about the box lid, I’m thinking that I need to separate it at the table saw. Meaning instead of a quarter inch gap for the router, I’ll need to leave an eighth inch gap for the table saw blade. I believe this will deliver the best result, even though cutting the lid out on the table saw seems dangerous, I’m sure it will go smoothly. I could perhaps cut 3/4 of the way through, keeping the lid fastened to the box, then finish the cut with hand saws and planes. That might be the way to go. Seems like a good balance between safe and fast.

  • Unfortunately there has not been much progress on the tessellated box project. I sanded the outsides to 400 grit, and routed the round over onto the box lid and base. Shortly after I started cutting the lid apart by hand but was interrupted by family shenanigans. I’m hoping that I’ll be able to get out into the shop this afternoon after I’m done working. Today is my Friday so I’m most definitely looking forward to the weekend. Much like last weekend, I’ll be looking to finish the tessellated box and I’ll hopefully have pictures early next week.

    My brother and I are going ice fishing on Saturday morning, which should be a ton of fun. I’m looking at getting a cheap shanti off marketplace so we don’t freeze our asses off. I’ll be hoping to get a little propane heater as well and we should be all set. It’s been tough the last few weekends but the weather has finally gotten cold enough so that there’s good ice. My brother and I are just getting into it so we aren’t kitted to the nines quite yet but we’ll get there soon enough. We just got some new fancy jigging rods that we’ll get to try out this weekend and I’m very much looking forward to it.

  • I had an idea this morning on my way to work that might make the cutting of the lid of tessellated box more accurate/straightforward. So the current procedure is to v carve the tessellated pattern, pour the epoxy, sand the epoxy and then re mount the pieces on the CNC to be cut into the rectangles that make up the sides of the box. During that last step, If I CAD in a horizontal break in the tessellation that is a quarter inch wide, then I can use the CNC to create the lid section of the box. Then, during glue up, I can scotch tape the two pieces together so the pattern gets aligned correctly as it’s being glued.

    With this method, I’m putting a lot of confidence into the scotch tape to hold things together, as it will also be holding the pieces together as the miters get cut on the table saw. I’m putting a lot of confidence into the CNC as well, for if the re-placement of the workpiece against the fence is off, then the pattern won’t look right. I suppose I can hand plane away any error and the seam will still probably look better than cutting the lid off with a hand saw. I might add a few hundredths of an inch to the router cut so that I have to plane the pieces down, which would further increase the accuracy of the seam.

    That adjustment to leave a quarter inch gap for the router bit to cut the lid pieces away from the base pieces happens at the very first step in the whole project, so I’m hoping that I wont forget to try this when I attempt to make the next one. I drew an example of what I’m looking to do in Canva:

  • There’s nothing too crazy different to report on since yesterday. I’m happy with the 3D printer upgrade, it definitely makes a significant difference in the amount of noise that’s coming out of the machine. I’ve sort of been in music making mode for the last few days and yesterday I rearranged a bunch of hardware in the studio. I know what needs to happen out in the shop but I haven’t gotten to it yet. Unfortunately that doesn’t make for a very interesting blog post. My daughter has daycare today so I’ll try to motivate myself to get out there for a couple hours to finish up the tessellated box project.

    I really like the way that this tessellated box is turning out. I’m very interested to try another pattern, and to sure up my method for making mitered joinery. Obviously doing it on the table saw with a sled is probably the best way to go about it, but I can’t help but think that there’s a better way. It seems that the miters are just a little bit off, and there might be some play in the table saw and sled that’s causing small gaps to occur at glue up. From a distance it looks fine but because the tessellations will likely be getting more and more detailed, those gaps will become more and more of a problem.

    I’d also like to do rabbeted joinery for the top and bottom. The butt joint looks a little sloppy on this first one. It should clean up with a round over but still. I’ve been wanting to make a humidor for myself so I’m thinking that’ll be the next project. The tricky thing with humidors is that the inside is lined with either Spanish cedar or Honduran mahogany. It’s easier for me to get Honduran mahogany here in Michigan and I’ve got some from the last time I attempted to make a humidor. A thin quarter inch lining is all that is needed, and I’d most likely do a box within a box method. I’d make the outer box first and then carefully do the lining with the mahogany. More research needs to be done there as to what method is best for my shop.

    Another adjustment I’d like to make is to CAD in a horizontal break in the tessellation that is the width of my table saw blade. This way I can cut the box lid off at the table saw, which seems a little sketchy, but it would theoretically be more accurate. I could also do this with my thin Japanese pull saw blades, but it’s almost not even worth doing, as those are around a 32nd or 64th of an inch thick. It really depends on how this first one turns out, and if the material that’s cut away makes the tessellation look weird at the seam.

  • Over the last week or so, I’ve been printing pieces to an upgrade to my 3D printer. I purchased my 3D printer on a black Friday sale last year and it cost $250 marked down from $350. It’s a FlashForge Adventurer 5M. 3D printing nerds might already know that you can modify this machine and FlashForge sells an enclosure kit where they send the hardware and acrylic panels, then you 3D print the parts for the enclosure. This mod gives the printer all of the bells and whistles of the higher end machines at a lower cost.

    There are a few benefits to this that really help quality of life: It reduces the noise of the machine, it helps regulate the temperature of the machine, which is important in 3D printing, and it keeps some of the fumes from escaping into the air. Albeit, I’m skeptical as to how effective that last point is, but we’ll see. I often like to print things overnight, and I had put a towel under the door in my office to keep some of the high frequency noise from entering into our bedroom. It’s an annoying thing to listen to when the house is quiet and we’re trying to sleep.

    I’ll attach a picture of the enclosure from 5M, I forgot to take a picture of my modded machine. It looks sweet but took forever and a day to build. Printing the parts took a total of 2 and a half days of printing time. Then removing all of the support structures took 2 or 3 hours yesterday. Figuring out how to assemble and build the enclosure kit took another 2 to 3 hours. A lot of cursing and frustration later, the mod was done. I ran a print last night and it really does help tame that high frequency noise so you don’t notice from 20 feet away.

    Next on the list of 3D printing things to-do is finish making the gridfinity for my office, and I’m not really sure what’s next after that. I’ve got some ideas for projects to do for work, as I’m still trying to convince them that we should get a 3D printer for the engineering shop. I might try to do more upgrades to the camera like making a motorized slider but we’ll see. I’d like to print some pointy pyramids that will help with finishing. I can put 2-4 of these down on the workbench flat, place the workpiece on top, and they’ll allow air to get underneath workpieces as the finish dries. That’ll take no time at all though, and are good for using up the ends of spools.

  • I ended up taking my Thursday and Friday off last week to help my wife with her mom. My wife has traveled to Ann Arbor every day since last Monday and so I helped with the house and toddler. It has been really rough on her and her guardian mom.

    I was still able to wake up early and make progress on some projects. The tessellated box project is almost done. I’ve attached a picture of it clamped up. I chose walnut for the top and bottom. I did a butt joint instead of rabbets. I wanted the full 1/2″ of material to be showing, and it saved me some time. I’m confident that the joint will be strong enough, even though I would have liked to do rabbets.

    The box is turning out fairly well. I tried to leave the top and bottom edges proud so they could be flush routed perfectly flat to the sides of the box. The miters are fairly good, I think if the tessellated pattern weren’t there I’d try to fill some gaps with a wood glue and maple sawdust mixture. I’ll leave them alone this time though because the pattern does line up really well on every corner.

    Next steps are flush trimming, routing on a round over on the top and bottom, sanding to 400 grit, and cutting the lid off. Once the lid is cut off I can install the hinges and add the feet. After that’s done I can finally apply some wood finish and it’ll be complete.