Noah B Woodworks

A woodworking page for the free time foot soldier

Hello there! My name is Noah Budd and I am a woodworker from southeast Michigan. I hail from a small set of towns in the Upper Peninsula called Houghton/Hancock. I lived there for 24 of my 31 years, and graduated from Michigan Tech in 2019 in audio production.

In my free time I am a dad first and hobbyist second. I make music, read books, smoke pipes, and kayak fish. I am a broadcast engineer in my professional life, working an early morning 3:30 – 11:30 am shift. The early bird has most definitely gotten a worm or two.

Thanks for stopping by my site and feel free to reach out to me on Instagram @noahbwoodworks or via the email found on the contact page

-Noah

  • There are still a few things I’d like to try out in the shop. The circle project being a long-standing one. I’d like to do a small test to see what it’s like to CNC inlay wood circles on top of themselves. I also need to finish my lidded humidor project. I need to acquire more mahogany for that project, which entails a trip to Rockler. Going to Rockler is risky business.

    I would also like to create a Jig for cutting miters. I can do them on the table saw now that I’ve removed the stabilizing clamps from the motor. I can do all sorts of angled cuts now, but I’d like to make a miter sled for the table top before I go too crazy. It would be nice to have a sled, and I’m honestly unsure why I haven’t built one yet.

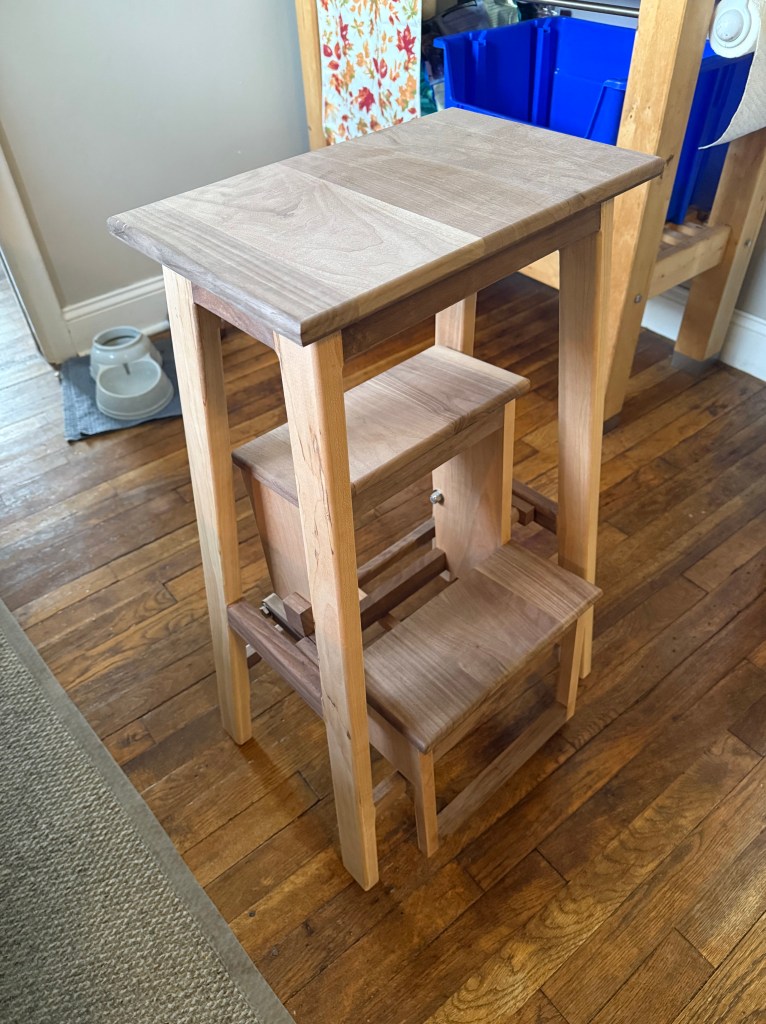
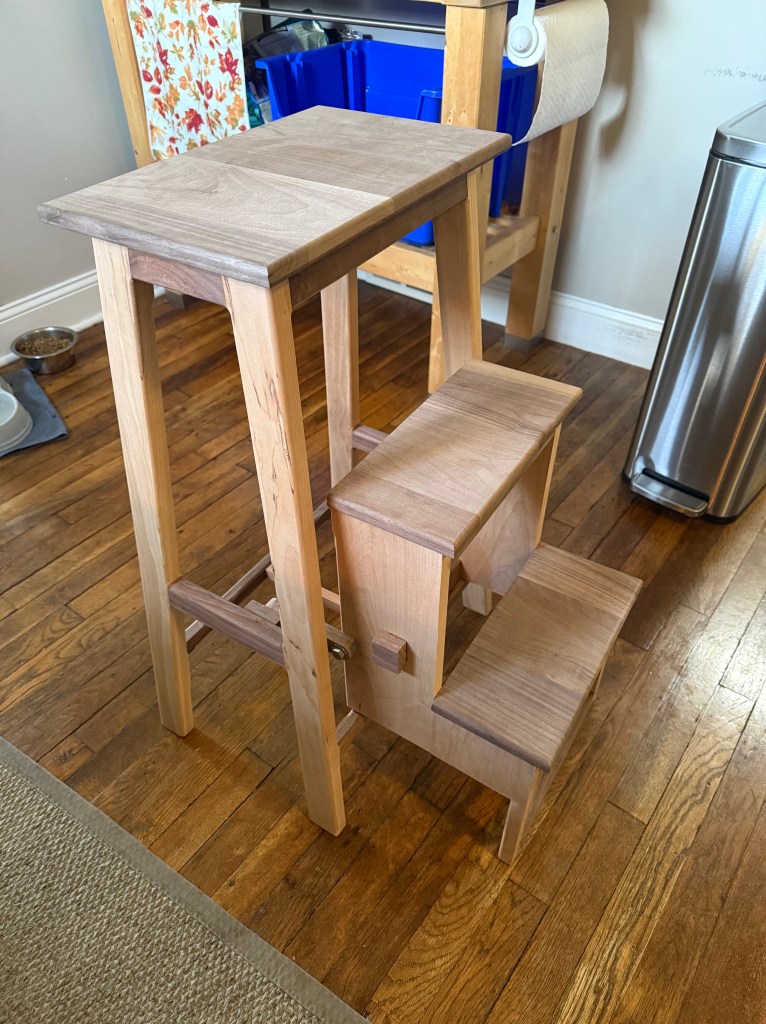
    So in order of importance: Miter sled, lidded humidor, circles on circles. I’m very excited that I can make angled cuts on the table saw now. I feel like a whole new world has been opened up to my woodworking. Last weekend I was able to make a myriad of 5 degree cuts to accomplish that fold out stool from my last blog post. I’m interested to see what that holds for my future.

    I’ve been thinking about puzzle boxes as well. The artisan crafted puzzle chests and boxes are so interesting to me. As a person who fidgets, I’ve always loved hand held puzzles. Recently, the craft of actually making the puzzles has caught my eye. It would be cool to make something like that for my daughter, so she can hide her treasures in a place we won’t ever look.

  • Last weekend I was able to finish a protype of a step stool using scrap wood and some cherry. This was quite a challenging little project, because the mechanism for which the steps extend was more complicated than what I normally build. The stool itself is a regular bar stool, with two little steps that fold out beneath the tall seat. The steps are supported by the framing of the stool, and the swing arm is bolted to the stool frame and the sides of the steps.

    The action of the swinging leaves a little to be desired, and is the primary topic of my focus moving forward. If I can sure up the action, so it isn’t sticky or cumbersome to use, I’ll have a winning design. I got pretty lucky this weekend that everything lined up in such a nice way. Moving forward, it would be good to make some of the parts on the CNC.

    I might have unlocked the potential of my table saw too. When I first received my table saw, the motor vibrated a lot, and it sketched me out, so I stabilized it. However, this drastically reduced the functionality of the table saw, making it difficult to do angled cuts. I removed the stabilizing clamps and the saw seemed to work just fine, so they’ll stay off. Angled cuts on the table saw are honestly so crucial if you’re looking to make anything that is more complicated, so I’m feeling good about the status of that tool.

    I’m looking forward to making more of these stools. It would be good to shrink it down a little, the size was just a little too big for my taste. Overall, I’m happy that I was able to build such an ambitious project in such a short amount of time. I used my tools efficiently and accurately despite being tired, which is usually where everything goes wrong and these projects turn into 2 or 3 week long endeavors.

  • I’ve been inspired in the past by the Samurai Carpenter. His woodworking is inspired by Japanese architecture. His work is very clean and soulful. He’s got a mortising machine that he uses for a lot of his joinery. It makes sense that a machine that makes square holes would be very useful in the shop. I was thinking you could use this for all sorts of applications. If needing to fasten two boards together, drill 2 holes and run a squared piece of timber, almost like a bolt, through them and glue it together. Seems like a person could make sturdier objects this way.

    There are quite a few mortising machines on Facebook marketplace for cheap. $200-$300 is a lot to spend on something that can be cut by hand, but the speed and precision might just be worth it. It’s one of those things that I’m not sure how much I’ll use it until I have it. My guess is it is the absolute best for making small shelves and small boxes. To be honest, anything rectangular or square in shape it could be useful for.

    Here I am, convincing myself to buy yet another tool, one I’ve had my eye on for a while. I am utterly hopeless in my attempt to keep my money, but this one might be worth it. Joinery can be tricky at times so if I were to pair the mortising machine with a router I feel like I’d have a fighting chance at making some really cool objects. Then when you add the CNC into the mix for decorative inlays, we might be cooking with gas. Its decided. I’m going to put in a bid on a mortising machine today, and figure out the rest later.

  • This weekend I’ve got a completely blank slate for the first time in a very long time. I have no projects on the horizon, and I’ve got nothing in the woodwork. To be honest I am thinking about going fishing, but it has been quite cold in the mornings – around 30 degrees Fahrenheit. If I do go, it’ll only be for one morning of this coming weekend, so what do I do with the other morning?

    I could clean the shop and sharpen my tools, which would be a good use of time. My shop is fairly clean though, because I gave it a deep clean not too long ago. Some of my tools are quite dull but I always sharpen when I go to use them. I need a small little one day project that I can finish really quickly. Low effort and quick to complete. I was thinking about doing a little box, maybe on the CNC?

    You know, many blog posts ago I talked about the idea to create a hanging wall piece with an inlay. Basically just do a few circles. Inlay a circle, cut a new circle, inlay a contrasting wood circle, and repeat until it looks cool. I might give that a go because it seems fairly low stakes and quick. A morning of experimentation is in my future it seems. I’ll probably start with white oak and attempt to use as much scrap wood as possible. Maybe I can make use of some of my scrap wood too. Make a bunch of cutting boards for Christmas or decorative wall art pieces. My buddy makes Christmas trees for his family, maybe I can take one out of his book and make some band saw reindeer or something.

    I usually have a good idea of what I want to do before I get into the shop, so not knowing drives me crazy. I like to have a plan of attack, so when there isn’t one my wheels start turning. I think I’ve got enough to go off and this should be a good; productive weekend. I am very much looking forward to it.

  • My brother asked me in January of this year to make him a huge 5.1 sound system. I am not really sure why I agreed to it, because the project was a little outside of my scope. The biggest sections of the project have been done, but there are some things still left to be done. I still need to make a center speaker, and the two surrounds. I’ve made the front left/right and the sub so far. These were particularly challenging for me because the joinery called for huge miters. I don’t have a proper table saw, so ripping miters has been a huge challenge for me.

    I’m thinking I’ll do these miters with a jig. I’ve got a bunch of aluminum linear rails from when I took my router table apart. I could use the linear rails in such a way that makes cutting miters relatively easy. My vision for this is a flat surface, with the rails elevated 3/4″-1″ off of the surface. The piece that is being mitered slides underneath the rails. A circular saw is fastened to a plate that is fastened to the rails. I measure and glue a stopping block, so all I have to do is butt the workpiece up against the stopper, run the circ saw down the linear rails and just like that: fairly accurate and quick miters.

    Clamping could be as straight forward as holding it down with one hand, but I think I’d like to have some sort of extra hold down. I have a bunch of lever action hold down clamps, but I could figure out another method for the farthest ends of the board to keep everything nice and flat against the jig. I’ve been thinking to make something like this for a very long time, for as long as miters have been an issue. I’ve got 12 big miters that need to be cut accurately, and having something like this should make creating a mitered box easier in the future if I ever needed to do it again.

  • As I was falling asleep last night I came across a really awesome video of someone who was using wood to print in the same way that a person might do a linocut. You carve the negative space out of an image and then ink the surface and it will print the image onto a piece of paper. It got my wheels turning about maybe using the CNC to do prints in a similar fashion.

    I really appreciated how he made the entire thing completely by hand. He sketched the image, tweaked it in photoshop, printed a template, glued the template to the wood, and carefully carved away the negative space away with a sharp knife. The final result was incredible and it takes great patience to have such quality craftsmanship. I could most definitely do something similar with the CNC and it would take a fraction of the time. It would sort of feel like cheating though, especially after seeing the soulful result that he got.

    I could probably draw the design and import a scan into Carveco fairly easily, then extract the vector. Programming the relief carving would be very straight forward. I’ve been looking for creative ways to push the CNC and this one does seem very interesting. This would definitely be a more unorthodox way of using the machine, which I like. Every time I come across someone doing a linocut print it always fascinates me and looks like a ton of fun to carve. The carving aspect is what looks fun though, so having the carving be done for me sort of sucks the life out of the process.

  • Yesterday I was looking after my daughter, which sometimes can be sort of boring. She’s playing happily with her toys, but what do I do? I pulled out my phone and started playing around with Google’s Gemini AI. I discovered that it can program web apps for you extremely fast. So at first I had it build a drum machine, but that quickly became too complicated for the AI and it started to get hung up, which was rather frustrating. I then asked myself, “what other problems can I solve with this?”. So I thought about my woodworking shop and how it sometimes takes me quite a while to add fractional inches together.

    I asked the AI if it could program me a fractional inches calculator and it did! I’m going to put the button presses in quotations its more clear what’s going on. You can press “1” “space” “5” “/” “16” “plus” “2” “space” “3” “/” “4” and it will do one and five sixteenths inches plus two and three quarters and give you the answer in fractional inches! I was very excited not only to have this tool for myself but I got to thinking that it might help someone else out there. I’ve looked for these on the app store before but they’re usually behind a rather large paywall or in need of a subscription.

    My next question to the AI was how do I put this on the app store? That answer was rather tricky, because you had to adjust the code to work in apple’s landscape. Apple’s landscape and the AI’s landscape are wildly different so the AI kept getting hung up trying to make the code work in both. The code will never work in both so this was rather frustrating. I was able to extract working code, though, and was able to simulate the WoodworkingCalc app on my MacBook. I based the color palette on maple, cherry and walnut wood tones so it sort of fits the environment it’s supposed to be in. I got majorly side tracked doing this yesterday, so who knows where it will go.

  • When I was living in DC with my girlfriend (now my wife) I craved woodworking like crazy. Before we moved to DC I worked in the scene shop for the university I was attending. We would work with sheet goods and 2x4s to build scenery for the plays that I would also have a hand in sound designing. It was one of my favorite jobs ever. Go in for 2-4 hours, get a cut list, make the cuts and continue building. It was stress relieving rather than stress inducing plus I was getting paid. During my last semester, I secretly used my time after work to build an electric guitar from scratch, alongside the big speaker set I was building for the transducer design class. I spent a ton of time in the shop that semester.

    I was unable to woodwork for around 3 years after that, and it was all I wanted to do. I would watch woodworking videos of my favorite makers and wish that I could be doing the same. I ended up cracking, and bought a cheap carving knife on Amazon that came with some small chunks of basswood. I would sit and carve on my couch over a tray, which actually worked quite well. That was while my wife and I had an unborn baby, so I carved a little toy for her while it was still safe to do so in the house.

    We moved back to Michigan shortly after. I started working with my grandpas old tools and a few of my own in the garage. My grandpa had this really cool hand driven miter saw that I used for a long time. It had a very dull blade so it took ages to cut the wood, but it was very square in the end. I bought the cheapest Stanley plane and worked hard to turn it into a good tool. I flattened the frog and learned to sharpen. I was able to get decent shavings out of that tool. I built my tool collection slowly and made a small set of projects those first few months for friends that I’d been away from for too long.

    I made my friend a whiskey cabinet from cherry wood, another friend a chess board, and another friend a beautiful walnut charcuterie board. These projects were the beginning of my woodworking journey, even though I had made a lot of stuff in my youth. I’ll always remember those projects as the start because they had meaningful purpose. I told my friends how much I appreciate them as our lives all went in completely different directions,

  • A friend of mine reached out over the weekend and asked if I could make her a chess board. We haven’t negotiated a price or a style yet, she asked what wood I like to use. I told her white oak, walnut, maple and cherry. She said that walnut and oak would be cool. It got me thinking that a chess board would be a perfect project to film. I don’t think I’ve made a chess board for my YouTube and it would give me an opportunity to plan and film a nice video. The key word there being plan, as I’d like to maximize the media that I generate. Perhaps do the chess board in 3 parts, with a set amount of Instagram posts in there as well.

    I’ve also been thinking it would be interesting to take a NDYakAngler approach to my videos too. He’s a fishing youtuber who gets regular comments that he is the Bob Ross of fishing. His videos are very relaxing to watch and he usually catches absolute monsters. People (including myself) love the simplicity of his videos. He just says “howdy everyone” at the beginning as he paddles through calm water.

    There are a few key advantages to his style that might be worth copying. It is a set it and forget it approach. I dislike filming in the shop sometimes because it takes away from the making, constantly having to rearrange the camera. By turning the GoPro on, and chest mounting it, the viewer gets a really good angle of what I’m doing, while I don’t have to worry so much about placement, angle, focus and light. Another advantage is its easy to get a lot of footage to work with, and the GoPro is extremely easy to use, which would allow me to focus more brain power into the woodworking. I wouldn’t have to worry about being on camera very often.

    I’ve got a nice camera that I used to use regularly that honestly looks spectacular, so it pains me to not use it. The GoPro is also very nice but it’s a GoPro. I read somewhere that it’s hard to watch a wide angle for a long time, but that might not be true. As I’m writing I am thinking that a set it and forget it approach might be the way to go. Place the nice camera on a wide angle mounted somewhere out of the way so I can cut to a wider shot of the entire shop when I feel like switching it up in the edit. The problem with my nicer camera is that it only shoots for 30 minutes at a time, so I do need to allocate some brain space for the management of it.

    My main struggle is consistency. Once I get my approach figured out, it should be smooth sailing. If I can generate a video a week, while working full time and being a full time dad, then I’d be more than happy. I write these blog posts to organize my thoughts in my spare time at work. Believe me, I’d much rather be working in the shop.

  • I have a boys weekend in Chicago coming up this weekend, so I decided to make gifts for everyone. I spoke about it a few blog posts ago. Luckily, I already had a batch of whiskey smokers made up, so I was able to sand and finish those with no issues. I made a bottle opener for my buddy who recently broke up with his girlfriend; I spoke more about that one in my last post. I made a really cool little watch display and lidded box for the bride and groom. I engraved small cherry plaques with their names on them and glued them to the padouk. Those turned out really well. I made little ball bearing mazes for my buddies twins, and my other buddies newborn. They’re engraved with the kids’ names and should be a good gift for them.

    The ball bearing mazes were actually quite a challenge to make. I did a few MDF prototypes to make sure that they worked before cutting into the white oak. I ended up using a quarter inch end mill to make the maze and a 7/32″ ball bearing. Luckily, I purchased a set of ball bearings in different sizes because I had no idea which one would fit best into the routed grooves. I have a quarter inch and eighth inch end mill, and getting fancy with the tool path would have taken way too much time.

    My quarter inch router bit left a terrible finish, so there was quite a lot of cleanup work to do. On every corner of the maze it left little furry fibers that either needed to be sanded or cut away. If I didn’t, the ball wouldn’t progress through the maze. This was very tedious work and it took a very long time. I capped the mazes, which are circular in shape, with a thin piece of 8″ diameter acrylic sheets. The acrylic also proved to be tricky. I didn’t drill large enough pilot holes for the acrylic so on one of the mazes it cracked and looks unsightly. I purchased 2 new sheets and will be redoing the acrylic for the twins.

    All in all, it was a very successful weekend of woodworking. I was able to churn out a bunch of product which was a good testing experience I prototyped some new objects on the CNC and I’m planning on making a bunch more bottle openers because they’re so useful and easy to make. I’ll be engraving U of M, Michigan State and Lions decals onto them for football season. I had forgotten how beautiful exotic wood can be. The padouk, when finished, was gorgeous. I tend not to use exotic woods because I don’t support deforestation, but I can see why people like to use them.